Articles tagged: code

In love with the BBC micro:bit

I finally got my hands on the micro:bit, the BBC’s new educational computer and spiritual successor to the legendary BBC Micro, and I’m absolutely in love with its potential as a platform for learning how to code.

The bottom side of the micro:bit, showing chip layout, pins, port, and reset button.

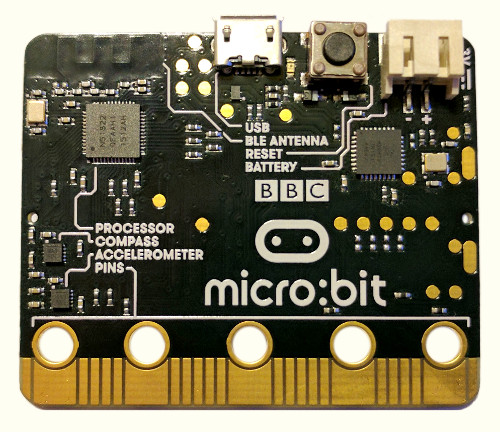
A lean (but not mean) learning machine. I like how the parts are all clearly labeled, as if to say: “There is no magic here. Everything that makes this board work can be understood.”

The platform

Microcontroller-based devices like the micro:bit offer some advantages over PCs as a tool for learning about programming. They can be connected directly to a variety of interesting peripherals to motivate experimentation. More importantly, they provide what is, in contrast, a radically simple programming environment: there are no operating systems, threads, processes, filesystems, or virtual memory to hinder a true understanding of what it means, in the most basic sense, for your program to run on a computer. When coding a microcontroller it is (to a certain extent) just you and the CPU.

On the other hand, it can take some effort to get up and running with most microcontrollers’ development environments. Even beginner-friendly kits like the Arduino will require special software and drivers to compile and load your firmware, which can make them a non-starter for some classrooms or casual beginners. And once all that’s set up, you’re likely going to be programming the thing in a dialect of C—not the most approachable choice for a new programmer.

So I’m delighted that the micro:bit delivers all the advantages of a microcontroller while providing an extraordinarily easy to use development system.

First, the platform: at the micro:bit’s heart is an ARM Cortex-M0 microcontroller running at 16 MHz, with 256 kB of flash and 16 kB of RAM. Its peripherals include a 5x5 array of LEDs with PWM, two buttons, a compass, an accelerometer, and a BLE radio; additional peripherals can be attached using a number of pins including I2C, SPI, and digital and analog I/O.

The top side of the micro:bit, showing two buttons and a five-by-five array of LEDs.

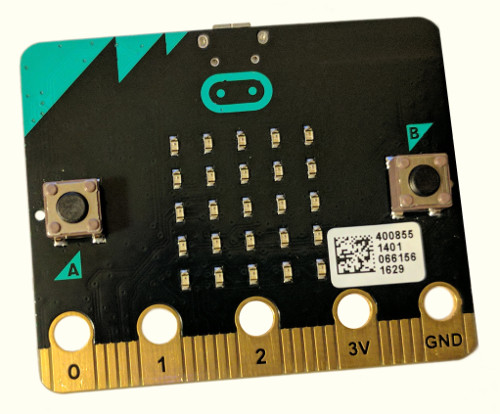
The micro:bit’s low-resolution yet highly programmable user interface.

I initially thought the micro:bit’s LEDs and buttons a laughably limiting provision for I/O, but after having programmed it I now think it’s a great idea. It provides just enough pixels to display scrolling text and basic graphics, while remaining simple enough that learners won’t be overwhelmed by a need to employ abstractions like sprites in order to create simple visuals.

The development environment

As for the development environment, there’s no software to install, which means the micro:bit should be readily usable by schools whose students use Chromebooks (or locked-down Windows machines or Macs). The only prerequisite is a web browser, which allows you to use one of multiple web-based code editors at microbit.org. And once you’ve written your program, there are no special drivers required to flash it onto the board; the micro:bit presents itself as a USB mass storage device, to which you need only download a hex file compiled by the editor in order to run your program.

Hobbyists will likely be drawn to the micro:bit’s MicroPython port (python.microbit.org). This includes a set of well-documented Python libraries to take advantage of the board’s peripherals, including external servos or neopixel LED strips. Advanced users can even access a Python REPL over the board’s USB serial interface.

As an engineer, I’m thoroughly impressed with the achievement of porting Python to the micro:bit. MicroPython generally targets the Cortex-M4, but here they got it running on an M0 with just 16 kB of RAM and no hardware floating-point support.

And it allows you to write succinct little programs like this one, which plays a tone on an attached piezo buzzer with a pitch depending on the angle at which the device is held:

from microbit import *
import music

def position():
    y = accelerometer.get_y()
    pos = (y + 1000) / 2000
    pos = min(pos, 1.0)
    pos = max(pos, 0.0)
    return pos

def tone_hz(pos):
    return int(80 * 55**pos)

while True:
    if button_a.is_pressed():
        music.pitch(tone_hz(position()), 10)

But for fledgling programmers I think Microsoft’s Programming Experience Toolkit (pxt.microbit.org) is the star of the show. It features mostly the same library features as the Python implementation, but it gives the user both Scratch-style block programming and event-driven JavaScript code—and it can translate your programs between one representation and the other, providing a nice set of quick-release training wheels for beginners. PXT also shows the output of your program as you type, in an emulated micro:bit displayed alongside the editor.

Some minor trouble

Unfortunately, my experience with the micro:bit has not been entirely trouble-free. The first unit I ordered developed a problem where the USB interface chip would overheat while connected to my computer, which has also been reported by other users. After this happened, I could no longer operate the micro:bit using its battery pack, and it would intermittently reset while powered by USB. I got a replacement unit which has yet to develop similar problems, but this experience doesn’t bode well for the robustness of a device that is meant to survive in the hands of 11 to 12-year-old students.

Update: jaustin from the micro:bit Foundation commented on Hacker News,

I work for the micro:bit Foundation, who have taken ownership of the project on from the BBC […] as the author hoped, the revision of the hardware now shipping is more resilient to ESD than the previous one :)

I also have some concerns about the placement of the external pins. Given that micro:bit kits like those sold by Tech Will Save Us use alligator clips to connect to the board’s pins, it seems way too easy to short out one of these pins with its neighbors.

Finally, the micro:bit’s 16 kB of RAM is quite limiting, at least when using the MicroPython runtime. While writing a moderate-size program I managed to repeatedly exhaust the SoC’s memory, resulting in difficult to debug MemoryExceptions. I can easily imagine intermediate users running up against and being confused by this limitation, and would welcome a version of the micro:bit with double the RAM. But to be fair, I have not yet tried writing a program of similar size with PXT, which may have less overhead or may handle memory exhaustion with clearer error messages.

The verdict

The above pain points aside, I’m extremely optimistic about the micro:bit’s potential for introducing a new generation of students to programming. I imagine that the overheating USB chip issue will be resolved, perhaps by a new board revision, and I’m looking forward to this board being generally available for distribution to schools in the USA and elsewhere.

Keyboard navigation in Emacs GDB mode

I love Emacs GDB mode, but I always found it annoying that there is no given key binding (or function which could be directly mapped into a key binding) for switching between the different views given by gdb-many-windows. The usual window and buffer switching functions are insufficient because the GDB windows are flagged as dedicated (so switch-buffer refuses to swap them in place), and in the case of the Locals/Registers and Breakpoints/Threads windows, the buffer you want to visit doesn’t necessarily even exist until you click that button.

This went from mildly annoying to a major headache when I needed to run the debugger in a remote Emacs session, over SSH from Mac OS X’s Terminal.app which does not support xterm mouse emulation. So I wrote this gdb-select-window function and corresponding key bindings to finally get the desired behavior…

;; For the consistency of gdb-select-window's calling convention...
(defun gdb-comint-buffer-name ()
  (buffer-name gud-comint-buffer))
(defun gdb-source-buffer-name ()
  (buffer-name (window-buffer gdb-source-window)))

(defun gdb-select-window (header)
  "Switch directly to the specified GDB window.
Moves the cursor to the requested window, switching between
`gdb-many-windows' \"tabs\" if necessary in order to get there.

Recognized window header names are: 'comint, 'locals, 'registers,
'stack, 'breakpoints, 'threads, and 'source."

  (interactive "Sheader: ")

  (let* ((header-alternate (case header
                             ('locals      'registers)
                             ('registers   'locals)
                             ('breakpoints 'threads)
                             ('threads     'breakpoints)))
         (buffer (intern (concat "gdb-" (symbol-name header) "-buffer")))
         (buffer-names (mapcar (lambda (header)
                                 (funcall (intern (concat "gdb-"
                                                          (symbol-name header)
                                                          "-buffer-name"))))
                               (if (null header-alternate)
                                   (list header)
                                 (list header header-alternate))))
         (window (if (eql header 'source)
                     gdb-source-window
                   (or (get-buffer-window (car buffer-names))
                       (when (not (null (cadr buffer-names)))
                         (get-buffer-window (cadr buffer-names)))))))

    (when (not (null window))
      (let ((was-dedicated (window-dedicated-p window)))
        (select-window window)
        (set-window-dedicated-p window nil)
        (when (member header '(locals registers breakpoints threads))
          (switch-to-buffer (gdb-get-buffer-create buffer))
          (setq header-line-format (gdb-set-header buffer)))
        (set-window-dedicated-p window was-dedicated))
      t)))

;; Use global keybindings for the window selection functions so that they
;; work from the source window too...
(mapcar (lambda (setting)
          (lexical-let ((key    (car setting))
                        (header (cdr setting)))
            (global-set-key (concat "\C-c\C-g" key) #'(lambda ()
                                                        (interactive)
                                                        (gdb-select-window header)))))
        '(("c" . comint)
          ("l" . locals)
          ("r" . registers)
          ("u" . source)
          ("s" . stack)
          ("b" . breakpoints)
          ("t" . threads)))

Put this in your ~/.emacs.el or init.el and fire up gdb-many-windows, and then you’ll be able to quickly switch between the GDB windows with the following keyboard shortcuts:

  • C-c C-g c — comint (GDB command) buffer
  • C-c C-g l — locals buffer
  • C-c C-g r — registers buffer
  • C-c C-g u — source window
  • C-c C-g s — stack buffer
  • C-c C-g b — breakpoints buffer
  • C-c C-g t — threads buffer

Both true and false: a Zen moment with C

Additional discussion: Hacker News, Reddit

I ran into a really fun bug at work yesterday, where I discovered that my C program was branching down logically inconsistent code paths. After drinking another cup of coffee and firing up GDB I realized that somehow, a boolean variable in my code was simultaneously testing as both true and not true.

While I cannot reproduce the actual source code here, the effect was that code like

/* ... */ if ( p ) puts("p is true"); if ( ! p ) puts("p is false");

would produce the output:

p is true
p is false

So what’s going on here?read more

Pointfree style in Python

Additional discussion: Hacker News

I’ve been getting back into Python lately… I just wrote a small module that provides support for pointfree style programming with a combination of automatic partial function/method application and operator overloading for function composition:

from pointfree import *
from operator import add

fn = pfmap(len) \
  >> pfmap(lambda n: n**2) \
  >> pfreduce(add, initial=0)

fn(["foo", "barr", "bazzz"]) # == 50

See the overview for a lengthier introduction. You can install the pointfree module from the Python Package Index:

$ pip install pointfree

Links:

GTK+ and Haskell (gtk2hs) on Windows

Update: Jacob Stanley has a great article on installing gtk2hs on Windows which goes into more detail, including a tutorial on GTK theming.

Gtk2hs is my favorite way to do cross-platform GUI programming in Haskell — and it’s the toolkit to use if you want to work through the examples in the excellent *Real World Haskell*. But the official instructions for building gtk2hs on Windows leave out some important information, so here’s how I got it all working on Windows 7…

Haskell Platform

First of all, if you haven’t done so already, download and install the latest release of the Haskell Platform for Windows (version 2010.2.0.0 at the time of this writing). Opt for the installer to add GHC and friends to your %PATH%.

GTK+

Next download the GTK+ 2.16 all-in-one bundle and extract it to C:\Gtk, then add C:\Gtk\bin to %PATH% by hand. (Alas, I was unable to get gtk2hs 0.11 to build with GTK+ 2.22 — it failed complaining that c:/devel/dist/win32/libpng-1.4.3-1/lib doesn’t exist, and I didn’t feel like messing with it beyond that point.) If you have Cygwin stuff on your Windows path, make sure the Gtk directory has higher priority; you can use PowerShell’s Get-Command to check on this, e.g. run get-command pkg-config and make sure the one in C:\Gtk\bin is listed first.

Verify that the library is installed correctly by running:

pkg-config.exe --modversion gtk+-2.0

The above will report the version number of your installed GTK+ library, e.g. 2.16.6. If you get an error message here then something is wrong…

MinGW

The gtk2hs documentation claims you don’t need MinGW installed to build on Windows, but this isn’t strictly true from our perspective: you’ll need MinGW’s gpp in order to build Haskell’s Cairo bindings, upon which the GTK module depends.

The good news is that all the MinGW components you need are already included with the Haskell Platform distribution, so just add its mingw\bin subdirectory to your path. Make sure that this, too, has a higher priority than any Cygwin (or SUA, for that matter) entries in the Windows environment variables; the Cabal installs we’ll be doing in a moment will attempt to invoke the strip command at the end of the build process, and things will go south if Cabal accidentally invokes Cygwin’s strip instead. (This had me scratching my head for longer than I care to admit…)

gtk2hs

Now you should have everything you need to install gtk2hs from Hackage:

cabal update
cabal install gtk2hs-buildtools
cabal install gtk

Hello, world!

You’re all set, assuming Cabal didn’t encounter any problems. Test it out by creating a file Hello.hs with the following:

Build it with GHC:

ghc.exe --make Hello.hs -o Hello

And then run Hello.exe. You should see something like this:

Hello, world from gtk2hs!

Happy hackage!

Windows tool to clean up OS X junk files

I wrote a little old-school Windows HTA script to delete the .DS_Store, .Trashes, and ._* junk files and directories typically littered across non-HFS media by Mac OS X:

nosx

You can download it from my GitHub account if you have a use for this sort of thing. Written and tested with Windows 7 and IE 8; I’m not sure how it will work with earlier versions of either. Standard disclaimers apply: use at your own risk, etc.

Incidentally, I think HTAs are really underrated as Windows scripting goes. More on that topic later…

Pagination